大熊云cloud
大熊云加速总教程【永久更新】
淘宝兑换码-使用教程
淘宝兑换码-使用教程
🍎IOS苹果手机
Shadowrocket使用教程
获取共享AppleID
🤖Andriod/鸿蒙手机
大熊云客户端(小白适用)
Clash 使用教程
🍏MacOS电脑
大熊云客户端(小白适用)
Clash使用教程
💻Windows电脑
大熊云客户端(小白适用)
Clash使用教程
外服游戏加速教程
本文档使用 MrDoc 发布
-
+
首页
Clash使用教程
<p><strong>使用前请先确认是否满足以下条件:</strong></p> <blockquote class="default"> <p>✔ 我的大熊云会员没有过期</p> <p>✔ 设备中没有开启其他VPN类软件</p> <p>✔ 我的网络不是校园网或者公司内网</p> </blockquote> <br> <h3 id="h3-u5BA2u6237u7AEFu5B89u88C5"><a class="reference-link" name="客户端安装"></a><span class="header-link octicon octicon-link"></span>客户端安装</h3><h4 id="h4-1.u5BA2u6237u7AEFu4E0Bu8F7D"><a class="reference-link" name="1.客户端下载"></a><span class="header-link octicon octicon-link"></span>1.客户端下载</h4><p>以下链接提供 ClashX 的安装包 软件提取密码:ai5r</p> <a style="display: block; border: 1px solid #ddd; padding: 16px; border-radius: 8px; text-decoration: none; color: inherit; width: 100%; box-sizing: border-box;" href="http://www.appkcc.com/s/clash5678" target="_blank"> <div style="display: flex; justify-content: space-between; align-items: center;"> <div> <h3 style="margin: 0;">🚀 Clash Verge 下载 如果下载不了用第二个</h3> </div> <div style="font-size: 1.5em; margin-left: 16px;">></div> </div> </a> <br> <a href="http://211.101.246.232:8888/down/07MwLpWvPNr1" style="display: block; border: 1px solid #ddd; padding: 16px; border-radius: 8px; text-decoration: none; color: inherit; width: 100%; box-sizing: border-box;"> <div style="display: flex; justify-content: space-between; align-items: center;"> <div> <h3 style="margin: 0;">🚀 Clash Verge 下载 软件2 提取码:8888</h3> </div> <div style="font-size: 1.5em; margin-left: 16px;">></div> </div> </a> <h4 id="h4-2.u62D6u5165u5B89u88C5"><a class="reference-link" name="2.拖入安装"></a><span class="header-link octicon octicon-link"></span>2.拖入安装</h4><p>官网首页下载客户端后,打开下载的<strong>「 ClashX.dmg 」</strong>文件,将<strong>「 ClashX 」</strong>拖拽到<strong>「 Applications 」</strong>文件夹当中</p> 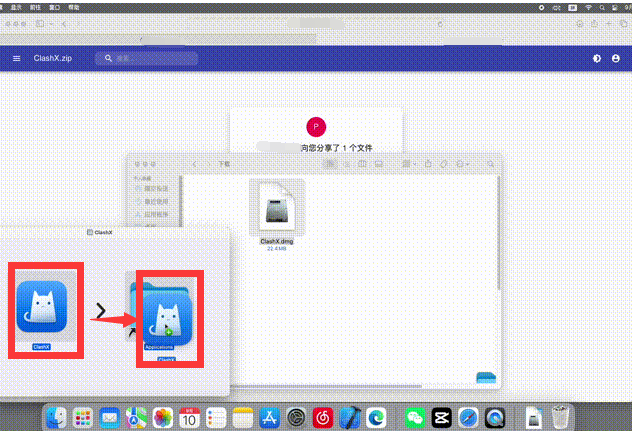 <br> <h4 id="h4-3.u542Fu52A8u5BA2u6237u7AEF"><a class="reference-link" name="3.启动客户端"></a><span class="header-link octicon octicon-link"></span>3.启动客户端</h4><p>在启动台或者应用程序中找到<strong>「 ClashX 」</strong>启动软件,首次打开的时候会有安全提示,点击<strong>「 打开 」</strong>选项</p> <p>根据系统提示点击<strong>「 安装 」</strong>然后输入电脑账户的密码并<strong>「 安装帮助程序 」</strong>,检测核查更新可根据情况自行选择检查或不检查。</p> <p>成功打开软件后,状态栏会出现<strong>「 ClashX 」</strong>的图标<br> 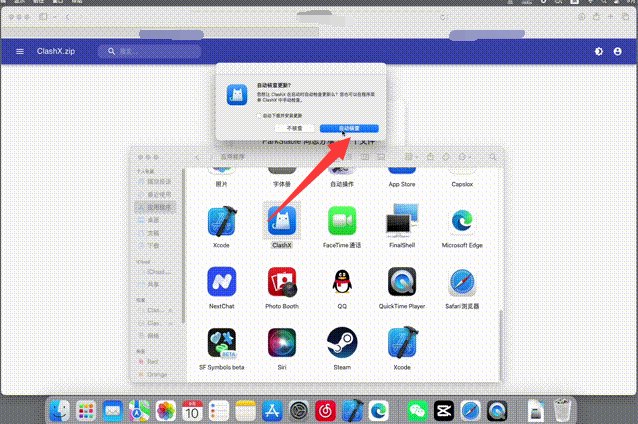 </p> <h3 id="h3-u5BFCu5165u8BA2u9605"><a class="reference-link" name="导入订阅"></a><span class="header-link octicon octicon-link"></span>导入订阅</h3><h4 id="h4-u65B9u5F0Fu4E00u81EAu52A8u5BFCu5165"><a class="reference-link" name="方式一 自动导入"></a><span class="header-link octicon octicon-link"></span>方式一 自动导入</h4><p>使用浏览器登录进入大熊云首页「 用户中心 」,如果您忘记了大熊云官网地址可前往 <a title="地址发布页" href="/doc/65/">地址发布页</a> 找到最新的官网地址</p> <p>在「快捷导入订阅」中找到<strong>「 Clash订阅 」</strong>按钮并点击</p> <p>点击后会自动提示跳转到 Clash 客户端,根据提示点击<strong>「 允许 」</strong>按钮。</p> <p>在 ClashX 弹出的<strong>「 添加托管配置文件界面 」</strong>点击<strong>「 确定 」</strong>按钮,即可成功订阅配置文件。</p> 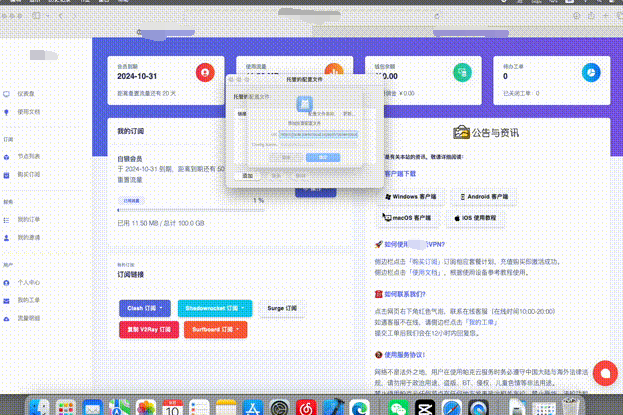 <br> <blockquote class="default"> <p>如果系统无法自动跳转或订阅失败,请参考下面 <strong>手动导入</strong> 方式</p> </blockquote> <br> <h4 id="h4-u65B9u5F0Fu4E8Cu624Bu52A8u5BFCu5165"><a class="reference-link" name="方式二 手动导入"></a><span class="header-link octicon octicon-link"></span>方式二 手动导入</h4><p>使用浏览器登录进入大熊云首页「 用户中心 」,<br>在「快捷导入订阅」中找到<strong>「 复制订阅地址 」</strong>按钮并点击钮</p> 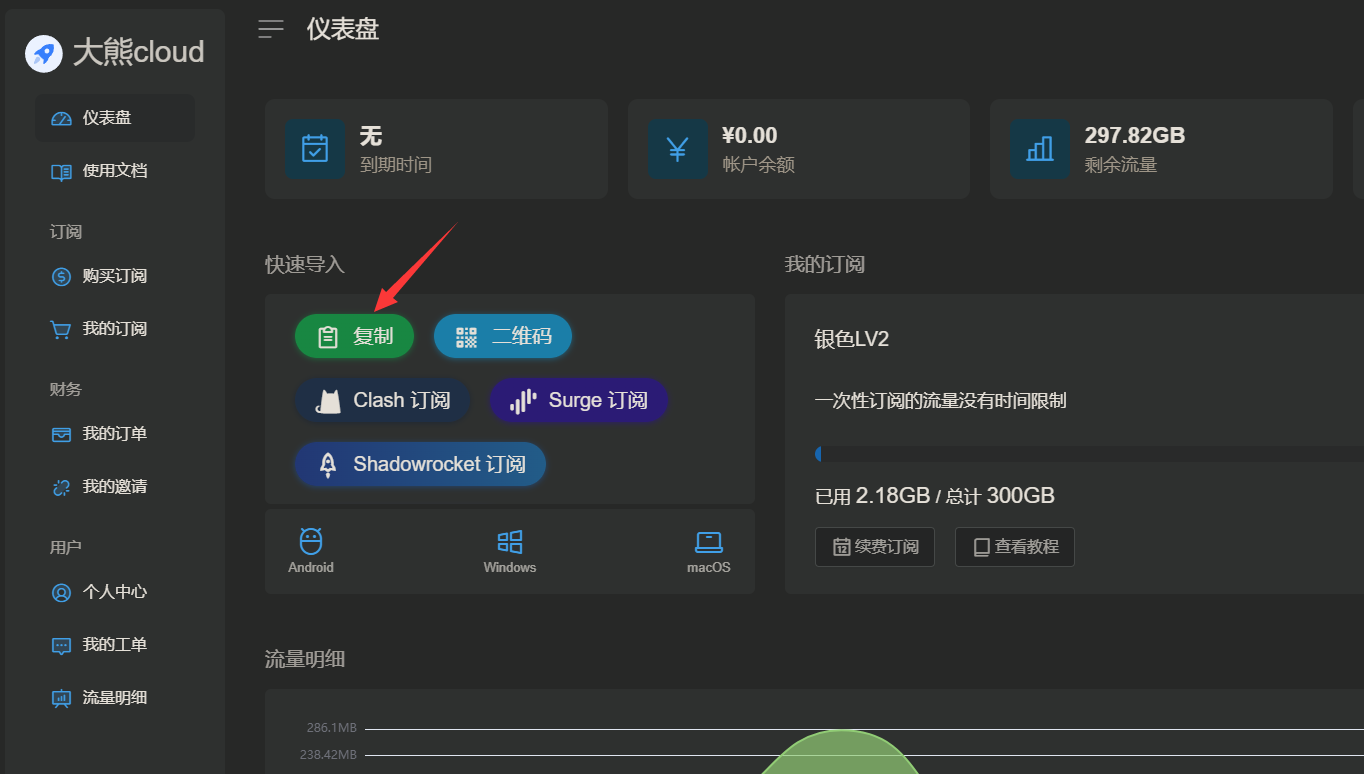 <br> <p>打开<strong>「主菜单」->「配置」->「 托管配置 」->「 管理 」</strong> ,在<strong>「 托管的配置文件 」</strong>下方点击<strong>「 添加 」</strong>按钮。</p> <p>将刚刚复制的地址粘贴进入<strong>「 Url 」</strong>栏,<strong>「 Config Name 」</strong>栏可随意填写,点击<strong>「 确定 」</strong>即可成功订阅配置文件。</p> 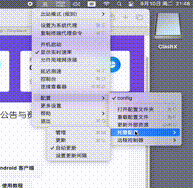c'c <br> <h3 id="h3-u5F00u542Fu4EE3u7406"><a class="reference-link" name="开启代理"></a><span class="header-link octicon octicon-link"></span>开启代理</h3><p>打开<strong>「 主菜单 」</strong>在<strong>「 出站模式(规则) 」</strong>中选择<strong>「 全局连接 」</strong>,然后在<strong>「 GLOBAL 」</strong>中选择一个国家地区节点。</p> <p>其他规则如「其他流量、Telegram」等可自行设置选择节点。</p> 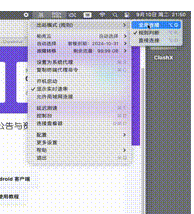 <br> <p>选择好国家地区节点并改为全局连接后,点击<strong>「 设置为系统代理 」</strong>开启系统代理。</p> <p>此时状态栏 ClashX 图标<strong>由灰色变成黑色</strong>,即成功开启了VPN代理。</p> 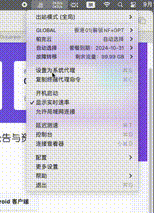 <br> <blockquote class="default"> <p><strong>使用建议:</strong></p> <p>订阅地址是你个人账号密码及节点的总集成,不能泄露给任何人及网络,以防止他人知晓并窃取你的密码。 </p> <p>建议定期手动更新订阅,即可保持与服务器同步更新。</p> </blockquote> <h3 id="h3-u66F4u65B0u8BA2u9605"><a class="reference-link" name="更新订阅"></a><span class="header-link octicon octicon-link"></span>更新订阅</h3><h4 id="h4-1.u5173u95EDu4EE3u7406"><a class="reference-link" name="1.关闭代理"></a><span class="header-link octicon octicon-link"></span>1.关闭代理</h4><p>打开状态栏<strong>「 主菜单 」</strong>将<strong>「 设置为系统代理 」</strong>取消勾选,关闭代理(这一步很重要)</p> 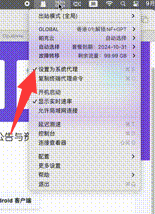 <br> <h4 id="h4-2.u66F4u65B0u8BA2u9605"><a class="reference-link" name="2.更新订阅"></a><span class="header-link octicon octicon-link"></span>2.更新订阅</h4><p>打开<strong>「 主菜单 」->「 配置 」->「 托管配置 」->「 管理 」</strong> ,在<strong>「 托管的配置文件 」</strong>下方选择已添加的大熊云订阅。</p> <p>点击<strong>「 更新 」</strong>按钮,即可成功更新订阅节点</p> 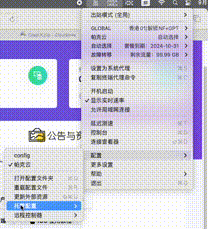 <br> <blockquote class="default"> <p><strong>更新失败解决办法:</strong></p> <p>删除「托管的配置文件」中的大熊云订阅。</p> <p>前往「 <strong>导入订阅步骤</strong> 」 根据教程一步一步操作,重新配置导入节点</p> </blockquote> </div>
mary
2025年11月26日 12:00
转发文档
收藏文档
上一篇
下一篇
手机扫码
复制链接
手机扫一扫转发分享
复制链接
Markdown文件
分享
链接
类型
密码
更新密码